Straightening a tilted photo: how much each degree costs, and the exact crop to use
Rotating a photo by a few degrees leaves empty corners that have to be cropped away. Here is how much of the picture each degree costs, measured quality loss, and crop numbers you can type in.
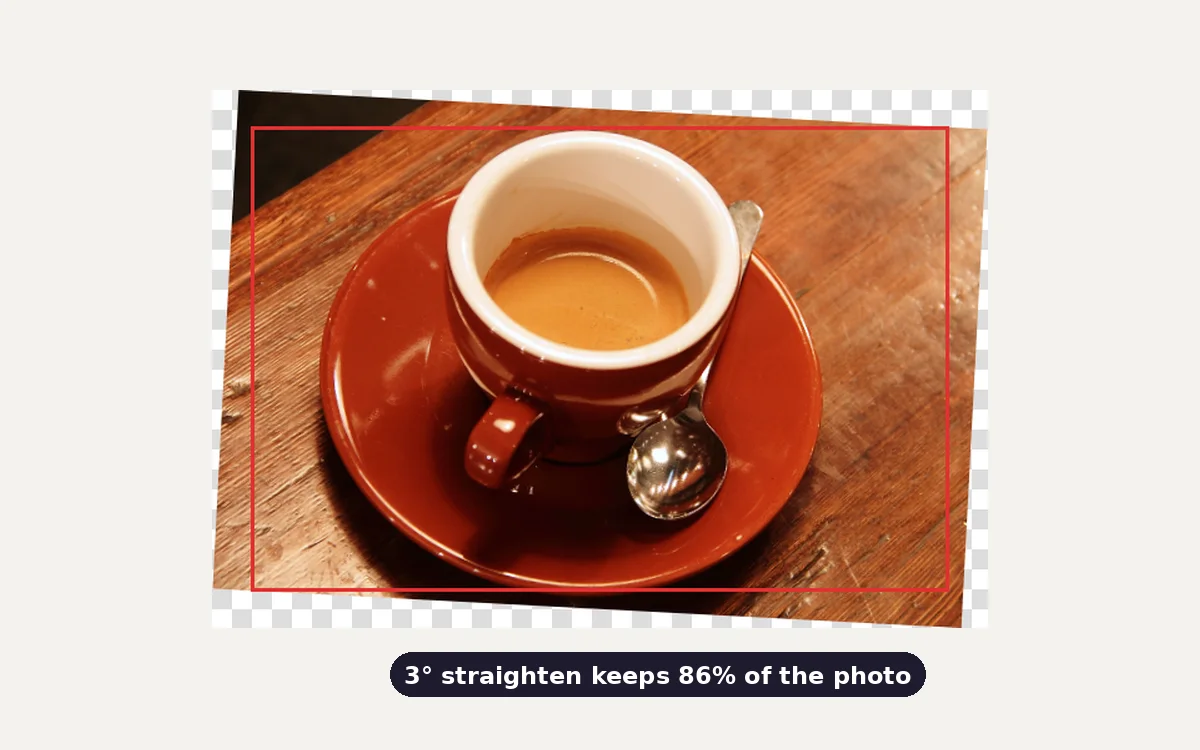
A horizon that leans by two degrees looks careless, and a doorframe that leans by three looks like a mistake. The fix is easy: rotate the photo the opposite way. But a rotated rectangle no longer fills a rectangular frame, so the fix has a price. This guide shows exactly what that price is, and how to pay as little of it as possible with the rotate tool and the crop tool.
What happens when you rotate by a few degrees
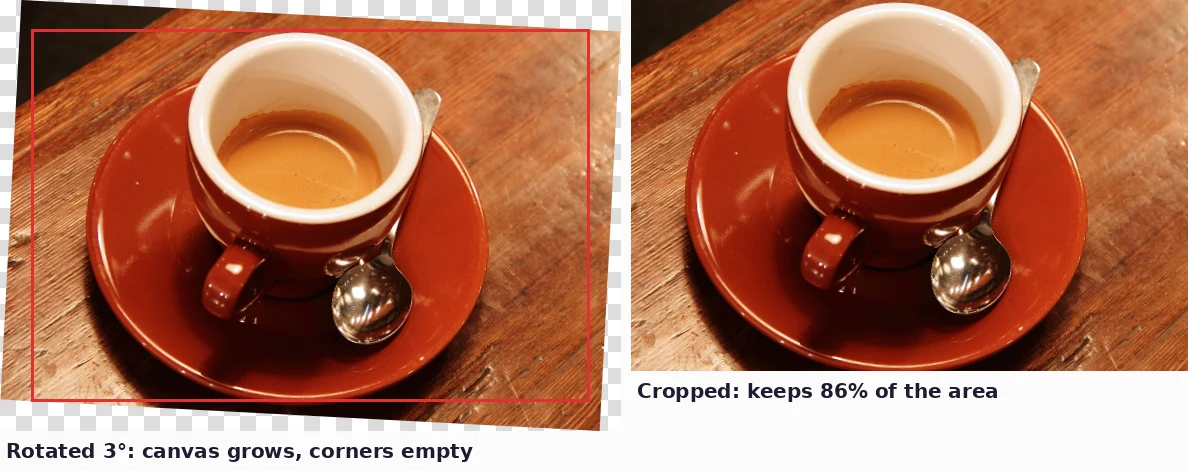
When the imgstools rotate tool turns an image by an angle that is not a multiple of 90°, it does two things:
- It enlarges the canvas so no part of the photo is cut off. We rotated a 600 × 400 photo and recorded the output size:
| Rotation | Output canvas |
|---|---|
| 1° | 607 × 411 |
| 3° | 621 × 431 |
| 5° | 633 × 451 |
| 10° | 661 × 499 |
| 45° | 708 × 708 |
- It fills the new corners. For PNG and WebP output the corners are transparent; we read back a fully transparent pixel (alpha 0). For JPEG, which has no transparency, they are white.
Keeping the whole photo is the right default, because you decide what to cut. But almost always you will want to crop those wedge-shaped corners away, and that crop is where the cost lies.
How much each degree costs
To remove the empty corners while keeping the original shape, you crop to the largest rectangle that fits entirely inside the rotated photo. For a landscape photo whose long side is r times its short side, rotated by angle θ, every side shrinks by the factor:
k = 1 ÷ (r × sin θ + cos θ)
The share of the original area you keep is k². Applied to common shapes:
| Tilt corrected | Square (1:1) | 4:3 (phones) | 3:2 (cameras) | 16:9 (video) |
|---|---|---|---|---|
| 0.5° | 98% | 98% | 97% | 97% |
| 1° | 97% | 96% | 95% | 94% |
| 2° | 94% | 91% | 90% | 89% |
| 3° | 91% | 88% | 86% | 84% |
| 5° | 85% | 81% | 79% | 76% |
| 10° | 75% | 68% | 65% | 60% |
| 15° | 67% | 58% | 55% | 49% |
The cost grows quickly: small corrections are almost free, while a 10° correction on a widescreen frame throws away 40% of the picture. Wider shapes lose more because their long sides swing further out of the frame. Portrait photos behave exactly like the landscape version of the same shape.
The exact crop for a 12-megapixel phone photo
For a 4032 × 3024 photo, rotate it in the rotate tool, then open the downloaded file in the crop tool and enter these values. They are the largest centred 4:3 crop with no empty corners:
| Rotation | Canvas after rotating | Crop width × height | X | Y |
|---|---|---|---|---|
| 1° | 4085 × 3094 | 3940 × 2955 | 72 | 69 |
| 2° | 4136 × 3163 | 3854 × 2891 | 141 | 136 |
| 3° | 4185 × 3231 | 3773 × 2830 | 206 | 200 |
| 5° | 4281 × 3364 | 3624 × 2718 | 328 | 323 |
For any other photo, multiply its width and height by k from the formula above, round down, then centre the crop: X = (canvas width − crop width) ÷ 2 and Y = (canvas height − crop height) ÷ 2.
How to measure the tilt
Guessing the angle usually leaves the photo slightly wrong the other way. Measure it instead:
- Find a line that should be level, such as a horizon, a table edge or a windowsill, or one that should be vertical, such as a doorframe or a lamp post.
- Note two points on it, far apart, in pixels. Many image viewers show the cursor position; otherwise use the crop tool's X and Y readout as a ruler.
- The angle is the arctangent of the rise over the run: angle = atan(vertical difference ÷ horizontal distance).
| Line drops by… | …over 4000 px | Tilt |
|---|---|---|
| 20 px | 4000 px | 0.3° |
| 50 px | 4000 px | 0.7° |
| 100 px | 4000 px | 1.4° |
| 210 px | 4000 px | 3.0° |
Type the measured angle into the rotate tool's angle box, which accepts tenths of a degree (the slider moves in whole degrees). A 0.7° tilt is corrected with 0.7°, not 1°, and keeps a little more of the frame. If the tilt is under about 0.3°, consider leaving it: most viewers won't notice, and you keep the whole frame.
Which direction? If the right end of the horizon is lower, the photo is tilted clockwise, so rotate anticlockwise (a negative angle in the tool), and vice versa.
The hidden cost: every small rotation softens the image a little
Turning a grid of pixels by 3° means almost every output pixel falls between four input pixels, so the browser has to interpolate. To measure that softening on its own, we rotated three photos by an angle and straight back again, then compared the centre with the original:
| Photo | ±1° | ±3° | ±10° |
|---|---|---|---|
| Espresso cup | 0.966 | 0.966 | 0.967 |
| Portrait | 0.974 | 0.973 | 0.973 |
| Cat | 0.955 | 0.958 | 0.958 |
SSIM after a rotation there and back, which is two rounds of interpolation. 1.0 would be identical.
Two lessons follow:
- The loss doesn't depend on the angle. 1° costs as much sharpness as 10°. That is the price of interpolating at all, not of turning far.
- Rotate once, from the original. Each extra pass adds another round of softening. If you overshoot, go back to the original file rather than rotating the rotated copy.
90° turns and flips are lossless
Right-angle turns are a different case. Every pixel lands exactly on another pixel, so no interpolation is needed, and the tool turns smoothing off for them. We rotated a photo by 90° four times in a row, saving a PNG each time. The result was pixel-for-pixel identical to the original. We also confirmed that rotating by 180° gives exactly the same pixels as flipping both horizontally and vertically.
So you can fix a sideways or upside-down photo, or mirror a selfie, as often as you like without degrading it. Choose PNG output if you also want to avoid JPEG recompression. If the photo is sideways because of camera metadata rather than the pixels, see our orientation guide.
When not to straighten
- Deliberate tilts. A tilted ("Dutch") angle can be a creative choice. If it is more than about 10°, it probably was.
- Converging verticals. Buildings that lean inwards when photographed from the ground are a perspective effect. Rotating fixes one side and makes the other worse. Correcting them needs a perspective transform, which the rotate tool doesn't do.
- Tight framing. If the subject touches the edges, a 3° correction might crop into it. Shoot looser next time, or accept the tilt.
Checklist
- Measure the tilt from a line that should be level or vertical.
- Rotate once, from the original, by the measured angle in the opposite direction.
- Crop with the k formula, or the table above, to remove the empty corners.
- Save as PNG if you plan more edits, or JPEG/WebP at 85+ for the final copy.
Method
Rotations used the rotate tool's canvas code (translate, rotate and drawImage with smoothing on, canvas enlarged to the rotated bounding box) in Chromium 141. The round-trip test rotated each photo by +θ and −θ on a canvas the size of the original and scored the central 70% with SSIM. Crop sizes come from the inscribed-rectangle formula above, rounded down to whole pixels. Photos: CC0 images by Rachel Michetti and Stefan van der Walt, and NASA's public-domain portrait of Eileen Collins.
Keep exploring
More from imgstools

Does Re-saving a JPEG Lower Its Quality? We Saved Photos 10 Times to Find Out
Read note
Why Photos Show Up Sideways After You Upload Them (and How to Fix It for Good)
Read note