How to get an image under 100 KB, 200 KB or 1 MB without ruining it
Upload forms love strict size limits. Using measured compression rates, here is how many pixels fit in each limit and the order of steps that keeps the image looking good.
Job portals, visa forms, school systems and forums often reject images over a fixed size: "max 100 KB", "under 200 KB", "no larger than 1 MB". The usual approach is to drag the quality slider down until the number fits. That works, but it often produces a blotchy image that is much larger in pixels than the form will ever display. There is a better order of operations, and the numbers below show why.
First, which kilobyte do they mean?
"100 KB" can mean two different sizes:
- 100,000 bytes, using decimal kilobytes (1 KB = 1,000 bytes).
- 102,400 bytes, using binary kilobytes (1 KB = 1,024 bytes, strictly called a kibibyte or KiB).
The imgstools compressor shows sizes in 1,024-byte units, as many operating systems do. Upload forms are not consistent, so aim for about 95% of the limit. A file under 95 KB passes a 100 KB rule either way.
The key fact: pixels cost bytes at a fairly steady rate
We encoded real photographs at every quality setting with Chrome's canvas encoder, the one browser-based tools use, and measured the size per megapixel. Averaged over four photos:
| Format and quality | KB per megapixel |
|---|---|
| JPEG 70 | 132 |
| JPEG 80 | 166 |
| JPEG 90 | 250 |
| WebP 70 | 96 |
| WebP 80 | 125 |
| WebP 90 | 208 |
These are upper bounds: our test photos are small and detailed for their size, and large camera photos usually compress better per pixel. They are still a dependable planning tool. Divide the size limit by the rate and you get a pixel budget: the largest image that will fit at that quality.
Pixel budgets for common limits
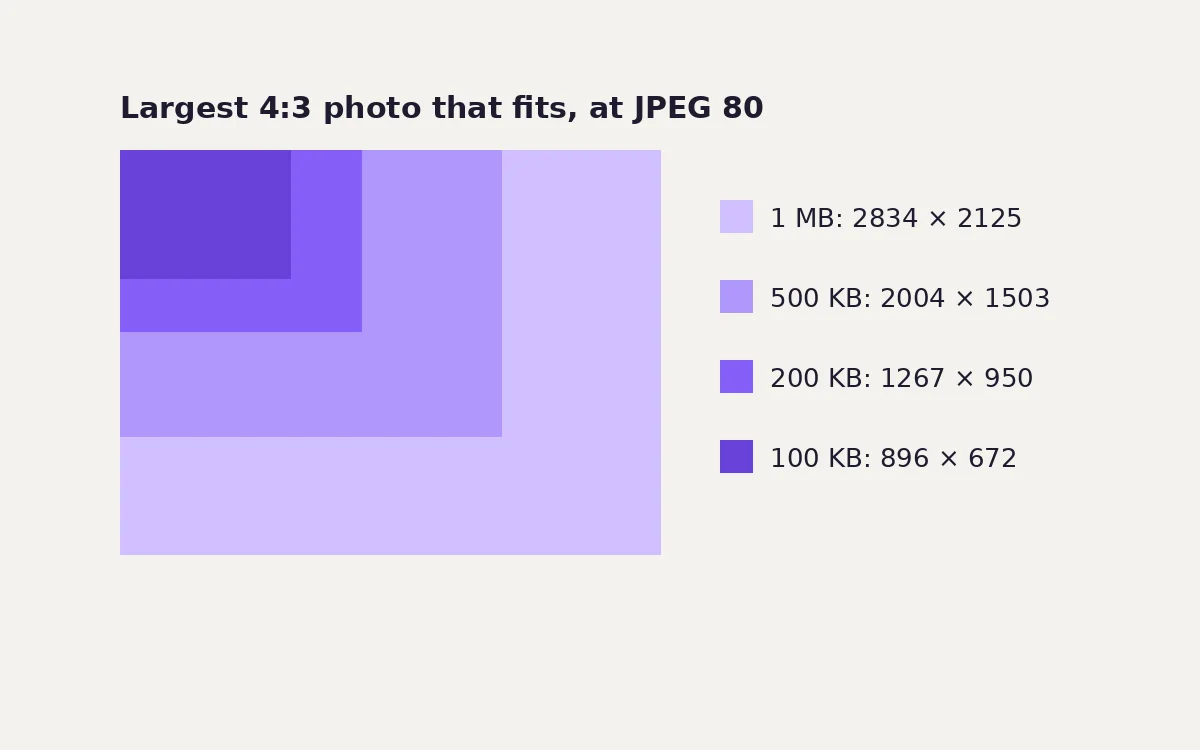
The largest 4:3 image that fits each limit, rounded down:
| Limit | JPEG 80 | WebP 80 | JPEG 70 |
|---|---|---|---|
| 50 KB | 633 × 475 | 730 × 547 | 710 × 533 |
| 100 KB | 896 × 672 | 1032 × 774 | 1005 × 753 |
| 200 KB | 1267 × 950 | 1460 × 1095 | 1421 × 1066 |
| 500 KB | 2004 × 1503 | 2309 × 1732 | 2247 × 1685 |
| 1 MB | 2834 × 2125 | 3265 × 2449 | 3178 × 2383 |
| 2 MB | 4008 × 3006 | 4618 × 3464 | 4494 × 3370 |
A full 12-megapixel phone photo (4032 × 3024) fits under 2 MB at JPEG 80, but to get under 100 KB it has to come down to roughly 900 pixels wide. Squeezing a 4032-pixel image into 100 KB with the quality slider alone would push quality far below the point where blocking becomes obvious.
What happens if you only lower the quality
To see this in practice, we took the hardest image in our test set, the Hubble Deep Field at 1000 × 872, packed with fine detail, and found the highest quality that fits each limit without resizing:
| Limit | Best JPEG | Best WebP |
|---|---|---|
| 50 KB | quality 30 · SSIM 0.74 | quality 40 · SSIM 0.75 |
| 100 KB | quality 60 · SSIM 0.79 | quality 75 · SSIM 0.82 |
| 200 KB | quality 85 · SSIM 0.86 | quality 85 · SSIM 0.89 |
SSIM measures similarity to the original; 1.0 is identical.
At 50 KB both formats had to drop to settings where compression damage is visible. Resizing the same image to 500 pixels wide instead produced a 44 KB file at a comfortable JPEG 80, smaller and cleaner than JPEG 30 at full size.
Screenshots are different: try WebP before JPEG
Screenshots of text behave nothing like photos. Our 1280 × 800 dashboard screenshot was 126 KB as a PNG. To fit under 50 KB:
- JPEG needed quality 60 (49.6 KB), with visible smudging around letters (SSIM 0.974).
- WebP fit at quality 95 (47.3 KB) and looked almost identical to the original (SSIM 0.991).
If the form accepts WebP, use it for screenshots. If it only accepts JPEG, crop away everything except the part that matters before compressing.
The step order that works
- Check the accepted formats. Many official forms accept only JPEG (sometimes PNG). Use WebP only if it is listed.
- Crop first. If the form wants a face, a document or a signature, crop to it with the crop tool. Every pixel you remove is a pixel you don't have to pay for.
- Resize to the pixel budget. Use the table above for your limit. Choose a size a little smaller than the budget and lock the aspect ratio in the resize tool. If the form states required dimensions, use those.
- Compress at 80, then adjust. In the compressor, pick the format, start at 80 and read the size. Over the limit: go down in steps of 5, but don't go below about 60. If you still don't fit, resize smaller instead. Well under the limit: go up in steps of 5 for extra quality.
- Check the result at 100% zoom. Look at faces, text and fine edges. If something looks smeared, you have pushed quality too low. Resize a little smaller and raise the quality.
Why PNG rarely fits
PNG is lossless, so the quality slider has no effect on its size. Our test photos averaged about 2,100 KB per megapixel as PNG, so even a small 0.3-megapixel photo is around 600 KB. If a photo must go under a limit, convert it to JPEG or WebP with the converter first. Keep PNG for logos and diagrams with flat colour, which compress well losslessly.
Common problems
- "The file is still too big after compressing." The image probably has far more pixels than the limit allows. Check the pixel budget table and resize.
- "The form says my image is too small." Some forms also set minimum dimensions. Resize to the minimum, then compress.
- "It looked fine before upload and bad after." Many sites recompress uploads. Uploading a file that already sits near the limit at a sensible quality usually survives a second compression better than one that was already over-compressed.
- "The colours changed." Converting from PNG to JPEG removes transparency; transparent areas become white in the imgstools converter. See our format test.
Method
Sizes come from Chromium 141's canvas encoder (drawImage, then toBlob) at each quality setting. KB per megapixel is the average of four public-domain and CC0 photographs. The pixel budgets divide each limit (1 KB = 1,000 bytes) by that rate for a 4:3 image and round down. The Hubble Deep Field and dashboard screenshot results are direct measurements at their full size. SSIM was computed against the lossless source with scikit-image.
Keep exploring