Fixing a dark or washed-out photo: brightness, contrast or saturation?
We darkened and flattened real photos, then tried 216 combinations of the Enhance tool's tone controls on each. The best fix depends on which problem you have, and the wrong one makes things worse.
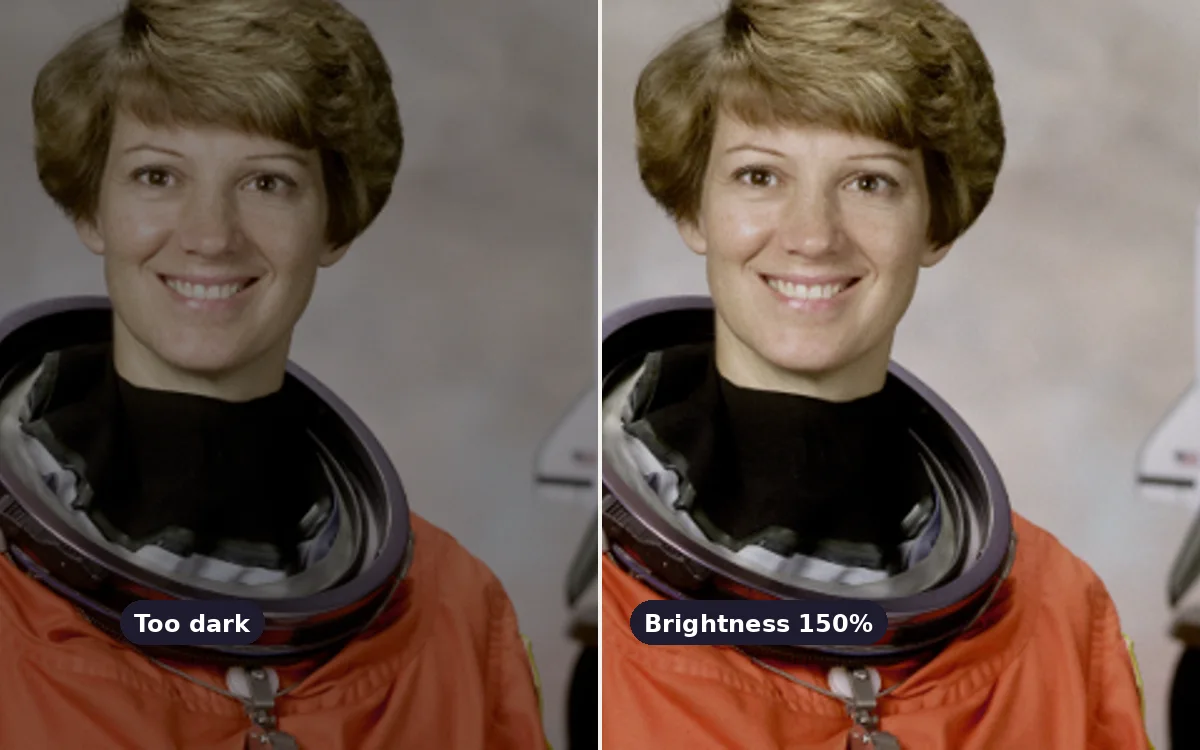
Most disappointing photos have one of two tone problems. They are too dark: taken indoors, against a bright window or at dusk. Or they are flat: hazy, foggy, shot through glass, or straight from a cheap camera, with no real blacks or whites. The Enhance tool has three tone controls: brightness, contrast and saturation. We wanted to know which ones actually fix which problem, so we tested them.
The experiment
We took three real photos (an espresso cup, a portrait and a cat), and made two damaged versions of each:
- Dark: every pixel value multiplied by 0.55, about what a badly underexposed shot looks like.
- Flat: contrast squeezed towards mid-grey (each value × 0.6, plus 20% grey) and colour reduced by 15%, like a hazy or washed-out shot.
Then we ran each damaged photo through the Enhance tool's exact tone code at every combination of brightness 100–150%, contrast 70–150% and saturation 100–130%. That is 216 settings per photo. Each result was scored against the undamaged original with SSIM (structural similarity; 1.0 means identical). Because we know what the photo should look like, we can tell which settings genuinely repair it, and which ones just change it.
Result 1: dark photos need brightness, and contrast makes them worse
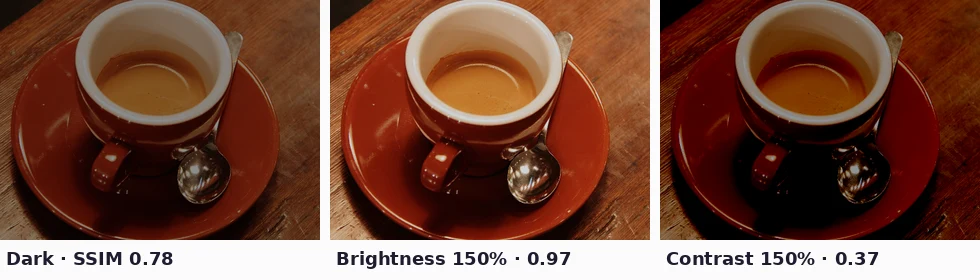
| Photo | Untouched | Brightness 130% | Brightness 150% | Contrast 150% |
|---|---|---|---|---|
| Espresso cup | 0.78 | 0.91 | 0.97 | 0.37 |
| Portrait | 0.79 | 0.92 | 0.97 | 0.55 |
| Cat | 0.77 | 0.91 | 0.97 | 0.43 |
For all three photos the best of the 216 combinations was brightness 150% with contrast and saturation left at 100%.
The common instinct, adding contrast to make a dull photo "pop", did real damage. Contrast stretches values away from mid-grey. In a dark photo almost everything is already below mid-grey, so more contrast pushes the shadows towards black and buries detail. Even moderate amounts hurt: brightness 120% with contrast 120% scored only 0.61–0.78, worse than leaving the photo untouched for two of the three photos.
Why 150% isn't quite enough
Our dark photos were darkened by a factor of 0.55, so a perfect repair needs a brightness of 1 ÷ 0.55 ≈ 182%. The tool's maximum is 150%, which got the espresso photo's average brightness back to 81 out of 255, against 99 in the original. For a very dark photo you can apply Enhance twice: brightness 150%, download as PNG, open the result and apply about 120%. The effects multiply (1.5 × 1.2 = 1.8). Saving the intermediate as PNG avoids adding compression damage between the passes.
Result 2: flat photos need contrast, and brightness ruins them
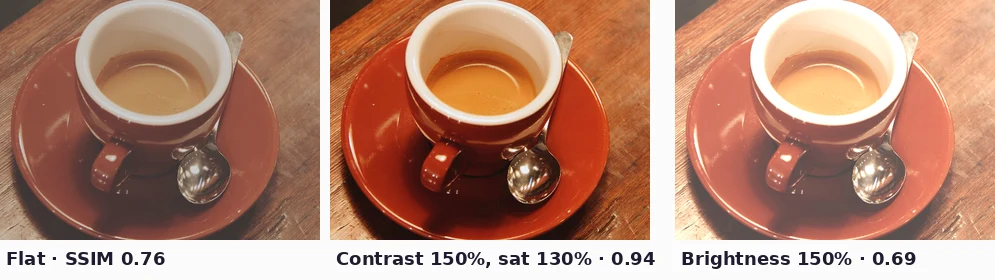
| Photo | Untouched | Contrast 150% | Contrast 150% + saturation 130% | Brightness 150% |
|---|---|---|---|---|
| Espresso cup | 0.76 | 0.91 | 0.94 | 0.69 |
| Portrait | 0.74 | 0.86 | 0.87 | 0.70 |
| Cat | 0.90 | 0.99 | 0.99 | 0.87 |
Here the best result was always contrast 150% plus saturation 130%, with brightness left at 100%. A flat photo has its values crowded into the middle. Contrast spreads them back out, and saturation restores the colour the haze took away.
Brightness was the wrong tool, and badly so. A flat photo is already light, so multiplying every value pushes the brighter half past the maximum. At brightness 150% we counted how many pixels hit pure white (255) in at least one channel:
| Photo | Original | Flat + brightness 150% |
|---|---|---|
| Espresso cup | 0.4% | 19.0% |
| Portrait | 0.2% | 31.9% |
| Cat | 0.0% | 1.0% |
Those clipped pixels have lost their detail for good: the white of the cup and the highlights on the face become flat white patches.
How to tell which problem you have
- Dark: the brightest parts of the photo aren't very bright, and shadows are murky but still have some shape. The photo looks like it was taken with the lights off.
- Flat: nothing is truly black, nothing is truly white, and the whole picture looks as if it is behind frosted glass. Colours look faded.
- Both: underexposed and hazy. Fix brightness first, then add contrast in small steps, checking that shadows don't block up.
Important: change the Enhance defaults for tone fixes
Enhance opens with settings designed for a quick general improvement: scale 2×, sharpening 30%, brightness 105%, contrast 100% and saturation 105%. For a tone fix, change two of them first:
- Set scale to 1× unless you also want to enlarge the image. Otherwise you get a file with four times the pixels.
- Set sharpening to 0 while judging tone, then add 10–30% at the end if needed.
Contrast starts at a neutral 100% on purpose. As the results above show, extra contrast makes dark photos worse, so add it only when the photo is flat.
Starting settings
| Problem | Brightness | Contrast | Saturation |
|---|---|---|---|
| Slightly dark | 115–125% | 100% | 100% |
| Very dark | 150% (repeat for more) | 100% | 100–105% |
| Slightly flat | 100% | 115–125% | 105–110% |
| Very flat or hazy | 100% | 140–150% | 120–130% |
| Dark and flat | 120–140% | 105–115% | 105–110% |
Then look at the result at full size. Check the brightest area (sky, white clothing, a lamp) for flat white patches, and the darkest (hair, shadows) for solid black.
What these tests don't capture
Our damaged photos were made mathematically from good originals, so they are cleaner than real problem photos. A genuinely underexposed photo also has noise in the shadows, and brightening makes that noise more visible. A photo that was already clipped, with a blown-out sky or a white window, cannot be repaired by any setting, because the detail was never recorded. Expect real-world results a little below our scores, and don't push a dark, noisy photo all the way to the maximum if the grain becomes distracting.
Method
Damaged versions were made with NumPy: dark = original × 0.55; flat = 0.6 × original + 51, then 85% saturation around each pixel's grey value. Tone adjustments used the Enhance tool's canvas filter chain (brightness, contrast, saturate) at scale 1 and no sharpening, in Chromium 141. Scores are SSIM against the undamaged original. Clipping counts pixels where any channel equals 255. Photos: CC0 images by Rachel Michetti and Stefan van der Walt, and NASA's public-domain portrait of Eileen Collins.
Keep exploring
More from imgstools
Can You Really Enhance a Low-Resolution Photo? What Upscaling and Sharpening Actually Do
Read note
How photo filters actually work: the maths behind grayscale, sepia, contrast and blur
Read note