Can You Really Enhance a Low-Resolution Photo? What Upscaling and Sharpening Actually Do
We shrank photos to half size, enlarged them back, and compared them with the real thing. Upscaling makes images bigger, not more detailed. Here is what it is good for.
Photo by Kawê Rodrigues on Pexels.
"Enhance" in TV dramas turns a blurry security frame into a readable licence plate. Real image tools can't do that. It helps to know exactly what they can do, so you use them where they help and avoid them where they mislead.
The test
We took eight photos at 1600 px wide as the "true" image. Then we:
- shrank each to 800 px, throwing away three quarters of the pixels, and
- enlarged it back to 1600 px in three ways:
- nearest neighbour, which simply repeats pixels (the blocky method),
- Lanczos, a high-quality smooth interpolation used by good image editors,
- Lanczos plus sharpening.
We scored each result against the true 1600 px image with SSIM, where 1.0 means identical.
| Method | Median SSIM vs the real image |
|---|---|
| Nearest neighbour (blocky) | 0.955 |
| Lanczos (smooth) | 0.956 |
| Lanczos + sharpening | 0.947 |
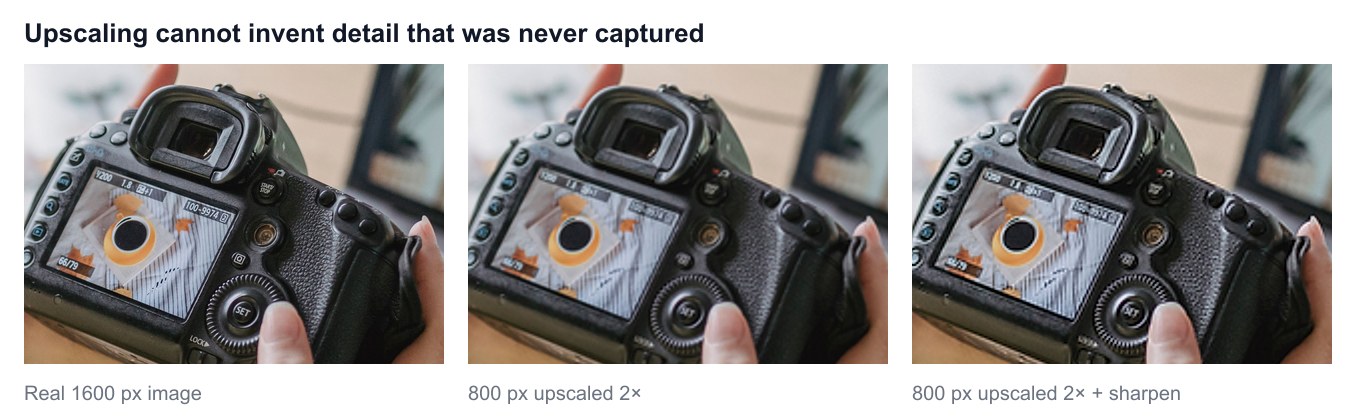
What the numbers say
The smooth method looks much better but is barely more accurate. Lanczos removes the jagged stair-steps, so the image looks far more pleasant than the blocky version. Measured against the real photo, though, it was only 0.001 closer. Neither method can restore detail that disappeared when the image was shrunk. Small text, fine texture and thin lines in the crops above are softer in both upscaled versions than in the real image.
Sharpening made it look crisper and less accurate. The sharpened version has more contrast along edges, which the eye reads as "sharper". But it moved the image further from the true pixels (0.947). Sharpening doesn't recover detail. It exaggerates the edges that are still there. Used lightly, that is a real visual improvement. Used heavily, it creates bright halos along edges and a crunchy, over-processed look.
We repeated it with the Enhance tool's own code
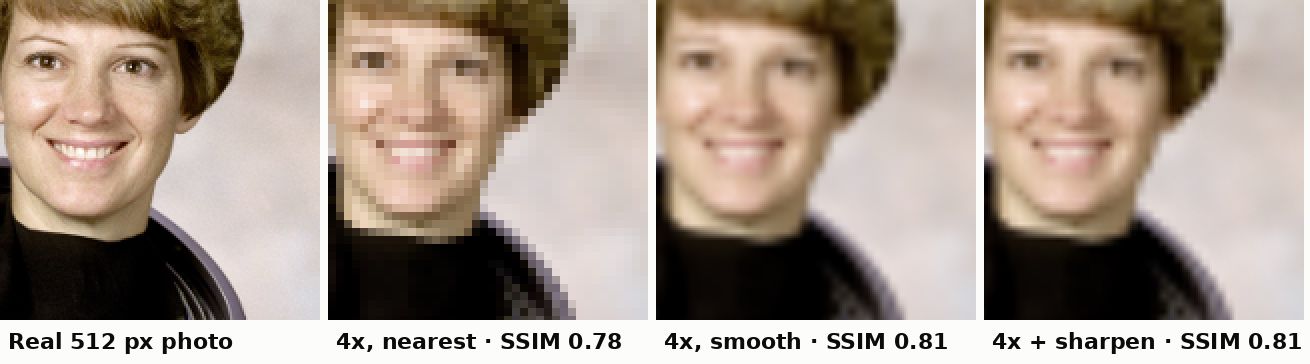
The test above used sharp's Lanczos resampling and its unsharp mask. We ran a second test with the exact canvas code of the imgstools Enhance tool: shrink a real photo to half or a quarter of its size, enlarge it back with the browser's high-quality smoothing, then apply the tool's sharpening.
| Method | Portrait 2× | Portrait 4× | Cat 2× | Cat 4× |
|---|---|---|---|---|
| Nearest neighbour | 0.919 | 0.783 | 0.889 | 0.754 |
| Smooth | 0.924 | 0.809 | 0.907 | 0.787 |
| Smooth + sharpen 50% | 0.931 | 0.812 | 0.915 | 0.789 |
| Smooth + sharpen 100% | 0.937 | 0.814 | 0.920 | 0.790 |
SSIM against the real full-resolution photo. Test images: NASA's public-domain portrait of Eileen Collins and a CC0 cat photo by Stefan van der Walt.
Two things differ from the first test, and both are useful:
- This sharpening raised the score a little at 2×. The Enhance tool compares each pixel with its four neighbours and pushes it away from their average, a gentler and more local effect than a strong unsharp mask. How much sharpening helps or hurts depends on the method and the amount, which is another reason to sharpen lightly and judge at 100% zoom.
- At 4×, nothing helps. Every method landed around 0.75–0.81. When 15 of every 16 pixels have to be filled in, no interpolation or sharpening can bring the lost detail back.
Pixel art is the exception. For icons and pixel art, nearest neighbour at a whole-number scale (2×, 3×, 4×) is exactly right: every pixel becomes a crisp square.
What about AI upscalers?
AI upscaling models go further. They don't just interpolate. They generate plausible detail, such as texture, eyelashes or brickwork, based on millions of images they were trained on. The results can look impressive. But the added detail is a well-informed guess, not information from your photo. That matters when the details are the point:
- Text, numbers and licence plates: an AI model can produce sharp, confident and wrong characters.
- Faces of real people: generated detail can change how someone looks.
- Evidence, documentation or product listings: the image may no longer show what was actually there.
For decorative images, AI upscaling can be a reasonable choice. For anything factual, use the original or a better source.
When upscaling and sharpening do help
- Slight softness from a phone camera, a mild focus miss or a resize: light sharpening noticeably improves perceived crispness.
- Small images that must fill a larger slot, such as an old logo or an icon you have no larger version of. Smooth upscaling avoids blocky pixels. It will look soft, but clean.
- Prints at a fixed size where the printer asks for a minimum resolution: upscaling with good interpolation avoids visible pixels, even though it adds no new detail.
- Dull or flat-looking images: brightness, contrast and saturation changes often improve a photo more than sharpening does. Our tone test shows which control fixes which problem.
What the imgstools Enhance tool does
The Enhance tool runs in your browser and gives you direct controls:
- Scale from 1× to 4× with high-quality smoothing.
- Sharpen from 0 to 100, which raises contrast at edges.
- Brightness and contrast (50–150%) and saturation (0–200%).
It is not an AI model and does not invent detail. That makes it predictable: what you see is your own photo, enlarged and adjusted. It saves as PNG so nothing is lost before your final step. For a photo you will put on the web, pass the result through the compress tool afterwards to get a small JPEG or WebP.
Practical settings
- Start from the largest original you have. A better source beats any enhancement.
- Upscale only as much as you need, for example to fill a 1200 px slot. Not to 4× just because the option exists.
- Sharpen lightly: 20–40 on a 0–100 scale is a good starting range for most photos. Check at 100% zoom. If you see bright outlines along edges, it is too much.
- Fix tone before sharpening. Contrast changes affect how strong the sharpening looks.
- Compress once at the end. See our quality setting test.
Summary
Upscaling makes an image bigger, not more detailed. Smooth interpolation looks better than blocky enlargement but recovers no lost information. Sharpening improves how sharp an image looks, at the cost of accuracy. AI upscalers add invented detail, which is fine for decoration and risky for anything factual.
Keep exploring