Will Your QR Code Scan? We Tested Logos, Contrast, Blur and Margins
We generated QR codes and tried to break them with logos, light colours, blur and missing margins. The results show how big a logo can be, why error correction doesn't fix blur, and why short links scan better.
A QR code that doesn't scan wastes a print run, a menu or a poster. Most failures come from a few design choices: a large logo, light colours, a code printed too small, or no white margin. We tested each one.
How we tested
We generated codes with the open-source qrcode library and decoded them with jsQR, the same libraries used by the imgstools QR code tool. Each design was decoded from a clean digital image. A phone camera adds angle, lighting and focus problems, so treat every "scanned" below as a best case.
The main test link was https://example.com/menu?table=12&utm_source=qr (47 characters).
1. Longer links make denser codes
A QR code is a grid of black and white squares called modules. The more data you put in, the more modules the code needs. Higher error correction also adds modules.
| Link | Length | Grid at level M | Grid at level H |
|---|---|---|---|
https://ex.co/m | 15 characters | 25 × 25 | 29 × 29 |
https://example.com/menu | 24 characters | 25 × 25 | 29 × 29 |
| The test link above | 47 characters | 33 × 33 | 41 × 41 |
| The same link with 3 more tracking tags | 108 characters | 45 × 45 | 57 × 57 |
At the same printed size, a denser grid means smaller modules. If the pattern (not counting the white border) is 3 cm wide, a 25 × 25 grid has modules about 1.2 mm across. A 45 × 45 grid has modules about 0.7 mm across, which is much harder for a phone to read from a distance or in poor light.
Tip: keep links short. Remove tracking parameters you don't need, or use a short link on your own domain.
2. How big can a logo be?
Error correction lets a scanner rebuild missing data. There are four levels: L (about 7% recoverable), M (15%), Q (25%) and H (30%). We covered the centre of each code with a solid block and increased its size until the code failed.
| Area covered | L | M | Q | H |
|---|---|---|---|---|
| 5% | failed | scanned | scanned | scanned |
| 10% | failed | failed | scanned | scanned |
| 15% | failed | failed | failed | scanned |
| 20% | failed | failed | failed | failed |
| 25–30% | failed | failed | failed | failed |
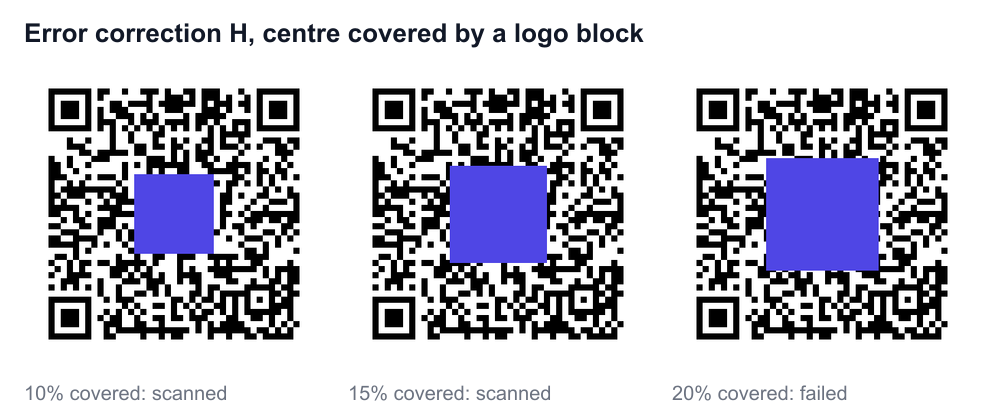
Level H, rated at 30%, failed at 20% coverage. The percentages describe how much data can be recovered, not how much area can be covered. A centre logo also covers the alignment marker (the small square-in-a-square near the centre on larger codes) and spreads damage over many blocks of data at once. The practical limit is lower than the label suggests.
Rules for logos:
- Use level H whenever there is a logo.
- Keep the logo to about 10% of the code's area, which is under a third of its width. That leaves a safety margin for real-world scanning.
- Put the logo on a solid background plate, so its edges don't mix with the modules.
The imgstools generator does this for you: adding a logo locks error correction to H, places the logo on a plate, and limits its width to 28% of the image.
3. Contrast: lighter than you think fails
We printed the dark modules in lighter and lighter greys on a white background:
| Module colour | Result |
|---|---|
Black #000000 | scanned |
Dark grey #404040 | scanned |
Mid grey #808080 and lighter | failed |
Mid grey on white looks perfectly clear to a person, but the decoder could not reliably tell it apart from the background. Phone camera apps vary, and some are more tolerant than jsQR. Don't design for the best scanner.
Rules for colour:
- Use dark modules on a light background. Some scanners can't read inverted codes (light on dark).
- Brand colours are fine if they are dark: deep navy, dark green or burgundy. Avoid pastel, yellow or mid-grey modules.
- Avoid gradients or photos behind the code.
4. Blur: error correction doesn't help
We blurred codes rendered at 4 pixels per module, as happens with soft printing, a smudged surface or a shaky photo:
| Blur strength (Gaussian sigma) | Level L | Level H |
|---|---|---|
| 0.5 px | scanned | scanned |
| 1 px | scanned | scanned |
| 2 px or more | failed | failed |
Level H failed at exactly the same point as level L. Error correction repairs missing modules, not blurred ones. When every edge in the code is soft, every module is uncertain. The fix for blur is bigger modules: print the code larger, or use a shorter link.
5. The quiet zone matters
The quiet zone is the empty border around a code. The QR standard asks for 4 modules. We placed a code on a dark grey background with no margin, and again with a 4-module white margin:
| Placement on a dark background | Result |
|---|---|
| No quiet zone | failed |
| 4-module white quiet zone | scanned |
Without the margin, the scanner can't find where the code starts. This is a common failure when a code is placed on a coloured flyer or cropped tight to fit a layout. In the imgstools generator, the quiet zone slider runs from 0 to 8 modules. Keep it at 4 for anything printed.
How big to print
A common rule of thumb is a code width of at least one tenth of the scanning distance:
| Where | Typical distance | Minimum code width |
|---|---|---|
| Business card, label | 20–30 cm | 2–3 cm |
| Table menu, flyer | 30–50 cm | 3–5 cm |
| Poster on a wall | 1–2 m | 10–20 cm |
| Shop window, banner | 3–5 m | 30–50 cm |
Use the larger end for long links, logos or low light. For print, export a large image (1000 px or more) or an SVG so the code's edges stay sharp.
Pre-print checklist
- Short link, so the grid stays small.
- Dark modules on a light background.
- Logo at level H, about 10% of the area or less.
- A 4-module quiet zone.
- Printed at least one tenth of the scanning distance.
- Test the printed proof with at least two different phones, at the real distance and lighting, before the full run.
You can design and check a code with the QR code tool. It also has a scanner tab, so you can test a code from a photo or your camera.
Keep exploring
More from imgstools
Using imgstools with AI assistants and browser agents: llms.txt, deep links and private files
Read note
What JPEG and WebP Quality Setting Should You Use? We Tested 8 Photos
Read note